
이번에는 가장 중요한 그레디언트 부스팅의 매개변수인 learning_rate과 모델의 트리 개수 또는 반복인 n_estimators에 초점을 맞출 것이다. 또한 확률적 그레디언트 부스팅(stochastic gradient boosting) 을 만드는 subsample 매개변수도 알아볼 것이다. 그리고 RandomizedSearchCV를 통해 XGBoost와 결과를 비교해보겠다.
3.1 Learning_rate
이전에 GradientBoostingRegressor의 learning_rate 매개변수 값을 1.0에서 사이킷런 기본값인 0.1로 바꾸어서 성능을 크게 높였었다.
learning_rate은 모델 구축에 너무 큰 영향을 끼치지 않도록 개별 트리의 기여를 줄인다. 이를 축소(shrinkage) 라고도 부른다. 이 매개변수를 주의 깊게 조정하지 않고 기본 학습기의 오차를 기반으로 전체 앙상블을 만들면 모델에 처음 추가된 트리의 영향이 너무 크게 된다.
learning_rate은 개별 트리의 영향을 제한한다. 일반적으로 트리의 개수인 n_estimators를 늘리면 learning_rate은 줄여야 한다.
최적의 learning_rate 값을 결정하는 것은 n_estimators에 따라 다르다. 먼저 n_estimators를 고정하고 learning_rate의 효과를 확인해보자. learning_rate을 0에서 1까지 바꾸어보자. learning_rate=1이면 트리 결과에 어떠한 조정도 하지 않는다는 의미이다. 기본값 0.1은 트리의 영향을 10%로 줄인다는 말이다.
1
2
3
4
5
6
7
8
9
learning_rate_values = [.001, .01, .05, .1, .15, .2, .3, .5, 1.0]

for value in learning_rate_values:
  gbr = GradientBoostingRegressor(max_depth=2, n_estimators=300,
                                  random_state=2, learning_rate=value)
  gbr.fit(X_train, y_train)
  y_pred = gbr.predict(X_test)
  rmse = MSE(y_test, y_pred)**.5
  print(f'lr: {value}, RMSE: {rmse}')
lr: 0.001, RMSE: 1633.0261400367258 lr: 0.01, RMSE: 831.5430182728547 lr: 0.05, RMSE: 685.0192988749717 lr: 0.1, RMSE: 653.7456840231495 lr: 0.15, RMSE: 687.666134269379 lr: 0.2, RMSE: 664.312804425697 lr: 0.3, RMSE: 689.4190385930236 lr: 0.5, RMSE: 693.8856905068778 lr: 1.0, RMSE: 936.3617413678853
출력에서 볼 수 있듯이 기본 learning_rate 값 0.1이 300개의 트리에서 가장 좋은 성능을 낸다.
이번에는 n_estimators를 바꾸어 보자. 위의 코드에서 n_estimators를 30, 300, 3000으로 바꾸고 learning_rate에 대한 RMSE 그래프를 그리면 다음과 같다.
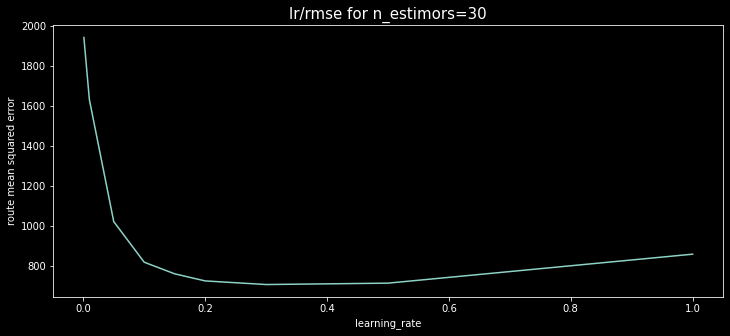
결과에서 보듯이 30개 트리를 사용하는 경우 learning_rate=0.3 근처일 때 최상의 성능을 낸다.
300개의 트리를 사용할 때 그래프를 그려보자.
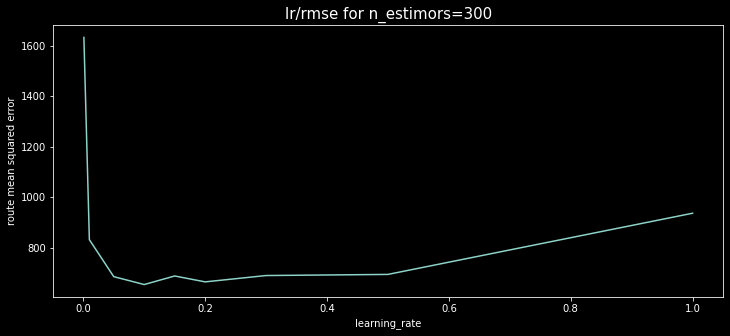
learning_rate=0.1일 때 최소임이 잘 나타난다.
이제 3000개의 트리를 사용하는 경우 learning_rate 그래프를 그려보자.
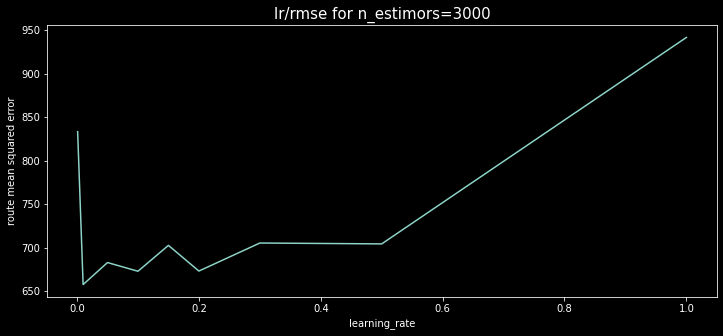
3000개 트리를 사용하는 경우 learning_rate이 0.01일 때 최상의 점수를 낸다.
이 그래프들은 learning_rate과 n_estimator 매개변수를 함께 튜닝 해야 한다는 점을 알려준다.
3.2 기본 학습기
그레디언트 부스팅의 회귀 모델의 기본학습기는 결정트리 이다. 이 결정 트리를 미세 튜닝할 필요는 없지만 정확도를 높이기 위해 매개변수를 조정 할 수 있다.
예를 들어, 다음처럼 max_depth를 1,2,3,4로 바꾸면서 결과를 비교해 볼 수 있다.
1
2
3
4
5
6
7
8
depths = [None, 1, 2, 3, 4]
for depth in depths:
  gbr = GradientBoostingRegressor(max_depth=depth, n_estimators=300,
                                  random_state=2)
  gbr.fit(X_train, y_train)
  y_pred = gbr.predict(X_test)
  rmse = MSE(y_test, y_pred)**.5
  print(f'max depth: {depth}, RMSE: {rmse}')
max depth: None, RMSE: 869.2788645118395 max depth: 1, RMSE: 707.8261886858736 max depth: 2, RMSE: 653.7456840231495 max depth: 3, RMSE: 646.4045923317708 max depth: 4, RMSE: 663.048387855927
max_depth=3일 때 최상의 결과를 낸다.
3.3 Subsample
subsample 매개변수는 기본 학습기에 사용될 샘플의 비율을 지정한다. subsample을 기본값인 1.0보다 작게 설정하면 트리를 훈련할 때 샘플의 일부만 사용하게 된다. 예를 들어 subsample=0.8인 경우 80%의 훈련 세트만 사용하여 각 트리를 훈련한다.
max_depth=3으로 지정하고 subsample에 따라 점수 변화를 확인해보자.
1
2
3
4
5
6
7
8
samples = [1, .9, .8, .7, .6, .5]
for sample in samples:
  gbr = GradientBoostingRegressor(max_depth=3, n_estimators=300,
                                  subsample=sample, random_state=2)
  gbr.fit(X_train, y_train)
  y_pred = gbr.predict(X_test)
  rmse = MSE(y_test, y_pred)**.5
  print(f'subsample: {sample}, RMSE: {rmse}')
subsample: 1, RMSE: 646.4045923317708 subsample: 0.9, RMSE: 620.1819001443569 subsample: 0.8, RMSE: 617.2355650565677 subsample: 0.7, RMSE: 612.9879156983139 subsample: 0.6, RMSE: 622.6385116402317 subsample: 0.5, RMSE: 626.9974073227554
300개 트리, 최대깊이 3일 때 subsample=.7에서 가장 좋은 점수를 냈다.
subsample이 1보다 작을 때 이런 모델을 확률적 그레디언트 부스팅 이라고 부른다. 확률적이라는 말은 모델에 무작위성이 주입된다는 말이다.
3.4 RandomizedSearchCV
잘 동작하는 모델을 얻었지만 그리드 서치를 수행하지 않았다. 앞선 모델을 참고했을 때 max_depth=3, subsample=.7, n_estimators=300, learning_rate=.1 근처가 그리드 서치로 탐색하기 좋은 출발점이다. n_estimators는 높이고 learning_rate는 낮추는 것이 좋을 것 같다.
1
2
3
4
5
6
7
8
9
10
11
12
13
14
15
16
17
18
19
20
21
params = {
    'subsample': [.65, .7, .75],
    'n_estimators': [300, 500, 1000],
    'learning_rate': [.05, .075, .1]
}

from sklearn.model_selection import RandomizedSearchCV
gbr = GradientBoostingRegressor(max_depth=3, random_state=2)
rand_reg = RandomizedSearchCV(gbr, params, n_iter=10,
                              scoring='neg_mean_squared_error',
                              cv=5, n_jobs=-1, random_state=2)

rand_reg.fit(X_train, y_train)
best_model = rand_reg.best_estimator_
best_params = rand_reg.best_params_
print(f'best params: {best_params}')
best_score = np.sqrt(-rand_reg.best_score_)
print(f'train score: {best_score:.3f}')
y_pred = best_model.predict(X_test)
rmse_test = MSE(y_test, y_pred)**.5
print(f'test score: {rmse_test:.3f}')
best params: {‘subsample’: 0.65, ‘n_estimators’: 300, ‘learning_rate’: 0.05} train score: 636.200 test score: 625.985
이 매개변수에서 한개 씩 혹은 여러 개를 바꿔서 실험해볼 수 있다. n_estimators=300이 최상의 모델이지만 learning_rate를 조정하고 n_estimators를 증가시켜 더 좋은 결과를 얻을 수 있다. subsamples도 실험해볼 수 있다.
몇 번의 실험을 반복한 후에 다음 결과를 얻었다.
1
2
3
4
5
6
7
gbr = GradientBoostingRegressor(max_depth=3, n_estimators=1600,
                                subsample=.75, learning_rate=.02,
                                random_state=2)
gbr.fit(X_train, y_train)
y_pred = gbr.predict(X_test)
rmse = MSE(y_test, y_pred)**.5
print(f'RMSE: {rmse}')
RMSE: 596.9544588974487
n_estimators를 1600으로 크게 늘리고, learning_rate를 .02로 줄였다. 그 다음 이전과 비슷한 subsample=.75와 max_depth=3으로 하여 597의 RMSE를 얻었다.
이제 XGBoost가 위에 언급했던 매개변수에서 그레디언트 부스팅과 어떻게 다른지 확인해보자.
3.5 XGBoost
XGBoost의 일반적인 구조는 동일한 그레디언트 부스팅의 고급버전이다. 즉 잔차로부터 훈련한 트리를 추가하여 약한 학습기를 강력한 학습기로 바꾼다.
이전에 소개한 매개변수와 다른 것은 learning_rate으로 XGBoost에서는 eta이다.
동일한 매개변수로 XGBoost 회귀 모델을 만들어보고 결과를 비교해보자.
다음처럼 xgboost 패키지에서 XGBRegressor를 임포트하고, 모델을 초기화하고 훈련한 다음 점수를 계산한다.
1
2
3
4
5
6
7
from xgboost import XGBRegressor
xg_reg = XGBRegressor(max_depth=3, n_estimators=1600,
                      subsample=.75, eta=.02,
                      random_state=2)
xg_reg.fit(X_train, y_train)
y_pred = xg_reg.predict(X_test)
print(MSE(y_test, y_pred)**.5)
584.3395337495713
점수가 더 좋다. 더 좋은 점수가 나온 이유는 다음에 자세히 알아볼 것이다.
머신러닝 모델을 만들 때 성능과 속도는 가장 중요한 두가지 요소이다. XGBoost가 매우 성능이 높다는 것을 여러 번 보았다. XGBoost가 일반적으로 그레디언트 부스팅보다 선호되는 이유는 더 좋은 성능을 내고 더 빠르기 때문이다.